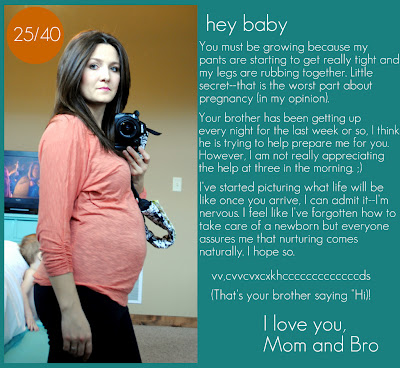
A few of you have asked how I make my love letters to our baby girl.
Many of my projects require me to use Photoshop, but this one can simply be made using Picnik.
And with Picnik closing down in April (sad day) right now is the perfect time to advantage of their site to have full-access to all their premium features.
wow. I sounded like a radio commercial...
So to begin I first open up Picnik.
To make a collage you will go to the top of the page and click on "Library," a new page will appear and you will want to click on "make a collage."
The arrow points to the specific collage format I use to make my love letters, be my guest though and play around with the different collage options.
They are kind of cool.
Once I have my collage template uploaded I then go to the bottom of the page and click on the arrows to the right of the words "Picnik Basket," there I have multiple options on how to upload my photos.
I then click on "upload photo" and I can then skim though the pictures on my computer for the picture I desire.
The photo will then upload on the bottom of the page. Once loaded grab the picture and drag it up onto the collage.
Once it is on the collage you can then move it around, if you don't like the photo simple click the "undo" button in the top right corner.
Also, while in the collage section feel free to change the background color, add additional columns, and change the angle of the pictures.
When finished click "done."
Now, comes the tricky part.
The text isn't very difficult to add, it is just more time consuming. And did I mention tricky?
In the left corner you will see a dialogue box where you can write. Begin writing you letter. I usually only write one or two sentences at a time. Once you are finished press "enter."
You will now notice that the text is huge and it is strung out across the page. You have two options for adjusting the font size. Play with the text box arrows, or drag the cursor over to the font box (the box with the rainbow colors) and adjust it there.
The text for my letters is usually between 32-34 and I always use the font Geosanslight.
Once my font size has been adjusted I then grab the far left size of the text box and drag it so the words line up with the left side of the right box (like in the picture above).
I then find the last word, which in this case is Daddy, and after that word I press enter.
I keep on doing this for every line until all the words show up in the box.
Once my first two or three sentences have been adjusted to fit the page. I then go back up to the text box and write my next paragraph.
I keep doing this until the page has been filled.
Once I have finished writing. I then go up to the top of the page and click on "stickers" I then go down to the basic shapes and find the circle.
This is a fun little add on so I know what week I am at in my pregnancy. Here I adjust the color and the fade of the circle.
Once the circle has been made I then click on "text" again and type the week. I then drag the numbers into the circle where I can re-size them to fit the shape.
Finally, click save.
Now, you have a fun card that you could easily have printed at Costco to send to friends and family.
card can be adjusted to a 4'x5' which can then be sent in the mail as a postcard.
Good luck picniking!


Your so gorgeous momma!
ReplyDeleteYou're so gorgeous!
ReplyDeleteOk I reallyREALLY want to be able to make something like lthis for my next baby. I can't stop thinking about it! Now that picnik is gone, what do you do? I have photoshop elements but so don't know how to use it yet.
ReplyDelete