Feature Friday: Fun Patterns (of all kinds...)

posted on: Friday, July 29, 2011

What better way to spend a Friday then with me, right?
 eh? eh?

Punk is still puking his guts out and I have come to the conclusion that in my next life (or even this one) I should be a marathon runner, because man oh' man do I have some stamina. Not only did I stay up all night with the munchkin but I changed his (and my) bedding five times, gave him three bathes, changed who knows how many diapers, and I am still alive this morning.

At the current moment...he is fast asleep in the bathtub.

This kid is pooped out and now that he is finally sleeping I am elated!
(insert: pom poms and uber excited cheerleaders yelling "Yay!")

So what better way to celebrate then to have ya'll show me some of your favorite tutorials and ideas.

Eye candy is the best because I don't gain any weight.

Hope ya'll also enjoy these amazing tutorials from last week!!!

Miss Madison's Charmed Life-DIY Chevron Wall

J and J Home: DIY Zebra Rug

Tattered and Inked: Yellow Harlequin Table

Sewcraftlicious: Tuna can pincushion

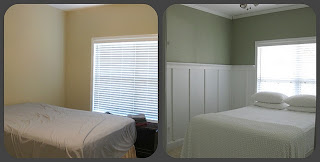
{twenty}something: Faux Board and Batten

Great job ladies!

Link Party Rules:
*Link to a specific post, not your homepage, or a giveaway.
*Post something that you have done in the last month and not something that you have posted previously on Spunky Junky
*Check out at least one other lovely and give them some sugar! Everyone loves comments and compliments.
*Grab my button and put it somewhere on your blog!
*Come back next week to see the featured projects


>
Photobucket

A little too much...

posted on: Thursday, July 28, 2011

I took on a little too much this week and usually when that happens it comes back to bite me in the bum cheeks.

Speaking of bum cheeks I went to the chiropractor yesterday because my pants have felt like they were hanging to one side. I should have known it would turn out bad when I used a coupon (cut out of the newspaper) to visit this (will remain nameless) establishment.

As the chiropractor performed his voodoo medicine which consisted of me holding viles of minerals to my chest, he ran his hands up and down my body mumbling, "liver, heart, lungs, pancreas, mumble. mumble. mumble." Then he had me raise my hands and squawk like a chicken.

jokes.

Once he was finished with my examination, he said, "Your lady parts aren't working right." My response, "Well, that's lovely." I would usually pay my GYNO for that type of consultation...

End result. My pants are still hanging across my left bum cheek.

Anyway.....

I took on a lot this week.

I have had a few emails asking me why all my lovelies in my farmers market booth aren't up for grabs in my etsy shop.

Answer:
I have been so busy trying to restock for the farmer's markets every week that I haven't had time to make duplicates (yet). I also decided that I would take on an additional third farmer's market every week so I am now scrambling just to shower regularly (shaving has become optional).

;)

But I pinky promise that as soon as farmer market season is over I will stock the shop with all of my lovelies. Including my oh so favorite rufflers!


So while there is no tutorial or divine words of wisdom today I will leave you with this...

My massive amount of laundry that is puked stained because Punk has found it necessary to puke on every single item of clothing today, as well as every couch cushion, every bed, every rug, and every inch of his momma's body this mornin'.

My mantra. 

I think laundry breeds on it's own... 

Photobucket

Tutorial: Limetini Ice Cream

posted on: Monday, July 25, 2011

Last week I had the opportunity to participate in the Country Chic Cottage's Beach Bash!
I live in Montana so the closest beach is, well, 734 miles away. So we don't get very "beachy" around here.

We do have our own "beach"  in town. But. it. ain't. no. beach.

trust me.

Even though we don't get to enjoy the salty aroma of sea water or the warm feel of sand between our toes we do love to enjoy the nice cold satisfaction of summer refreshments!


One of my favorites is a little dish I call Limetini Ice cream.

Years ago I had something similiar, but I forgot the exact recipe so I had to come up with my own concoction, which is a-mazing!

Photobucket
To make your own limitini ice cream you will need:

Vanilla or Vanilla Bean Ice Cream
Ice
Margarita Mix--Lemon Lime and/or Strawberry Lime
Mint Leaves
Mixer
And most importantly--your Par-tay Pants!

We go virgin style because we don't drink, but I am sure if you wanted to you could add your own "special" ingredient.
Photobucket
Usually when I make this refreshment I fill the blender with 1 1/2 cups of margarita mix, two mint leaves, and then I top it off by filling the blender half full with ice.

Photobucket
I usually only use the "chop ice" option on my blender because I don't want the ice to become liquidified. I know I am finished chopping when all the ice has a nice shaved ice consistency to it.

Photobucket
Once the ice has been chopped I then scoop ice cream into glasses, top them with my margarita mix, and then add a final mint leaf as a garnish!

Simple. Easy. Fun. Refreshing!

Now the only good way to enjoy your beautiful limetini or strawtini ice cream is while laying back in a lawn chair, drink in hand, soaking up the afternoon rays, while reading Spunky Junky on your lap top!

;)

Thanks for stopping by and if you want to join me I am partying here!


Photobucket

Feature Friday

posted on: Sunday, July 24, 2011

Thought I would pop in and say "Hi!" I wanted to show off a few of my favorites this week! Hope ya'll are having an amazing weekend!

I will be back bright and early tomorrow morning, until then--ENJOY!!!

Southern Lovely-DIY Skirt

The Tall Chick-Revamped Chandelier
Tattered and Inked-Laundry Room Makeover
Charming Decor-Bathroom Makeover

Link Party Rules:
*Link to a specific post, not your homepage, or a giveaway.
*Post something that you have done in the last month and not something that you have posted previously on SJ.
*Check out at least one other lovely and give them some sugar! Everyone loves comments and compliments.
*Grab my button and put it somewhere on your blog!
*Come back next week to see the featured projects


Crazy drivers and a Winner!

posted on: Friday, July 22, 2011

 Hunk and I spent the good part of 15 minutes racing up an down our subdivision trying to get some stellar pics of the amazing sunset.

Reverse. Drive. No, reverse again. No Drive! Left! No, right! Back up. More! More! Stop! Left....you get the point.

I'm not positive, but I am sure that the cops may have been called due to a suspicious red dodge driving erratically on the road....

We may not have Tiffany's, Rodeo Avenue, Broadway, Starbucks, (or Old Navy) but we do have the best sunsets. ever.

Now, that's a fact.

P.S.
Sorry, for no Feature Friday. It will be up tomorrow. promise.

Hunk started a new job (he's kind of a big deal) and we don't get to see his purdy face much so I am going to take full advantage of him tonight and force him to make out with me and then rub my feet...
P.S.S.
The winner winner of the Ultimate Body Applicator is....#24 Lizzy @ Warm and Fuzzy.

You are one lucky duck chicka!

Email me within 48 hours!

Photobucket

butts, birds, and swings...

posted on: Thursday, July 21, 2011

Yes, they all have something in common.

Today, I replaced crappy bums with bare bums, lots of sun, hungry birds, and hystarical laughter while flying through the air on the swing with my Punk.

This afternoon was a special treat because we got to hang out by the pond near the place I lived in college. This place brings back lots of memories, some sad, some happy.

I learned how to iron clothes (properly) here.

I made my first turkey here.

I cried over boyfriends here.

I met Hunk here.

I learned how to unthaw pipes here.

I had sleepovers here.

I had my first Hawaiian Christmas tree here.

I paid my first rent here.

I found myself here.

I got proposed to twice here (both by Hunk).

So this place is kind of special and I hope that I can now start new memories here with Punk.
shirt: downeast basics, circa 2010 necklace: spunky junky

I want him to remember flying through the air.
I want him to remember bouncing across the trail in his stroller.
I want him to remember to ignore the signs and still go ice fishing with his Daddy.
I want him to remember that this is where his Dad proposed to his Momma.
I want him to remember feeding the noisy geese and ducks...
I want him to remember that all the scraps and bruises he got will always be signs of all the fun he had that day.
 And when he is not on the swings and feeding the ducks I want him to look back and cringe at all the naked pictures of took of him today, because...

Punk is happiest when he can run around with his bum and man business flowing in the breeze. He is also prone to pee on the sidewalks, I am fine with that until he tries to play in the puddle he created...

*blehk*

But these are all memories that I would love us to remember!
 
Photos edited using Vignette for Android. Actions: Velvia, Instant transfer 1

FYI...tomorrow is the last day to win the Ultimate Body Applicator Skinny Wrap!

The end.
Photobucket

Crap Happens...

posted on: Wednesday, July 20, 2011

Today was a crappy day. No, not in the figurative sense, but literally.

 For the last few weeks I have had this sty on my eye. I named it Ernie. Ernie is nice and all, but I figured I needed to start wearing make up again. 

Whaaaat? makeup? Yeah, I wear it sometimes...

So I decided that today would be that day that Ernie and I would part paths.

This afternoon I was running into town really quickly to mail a few packages and on a whim I decided to see if the doc had an opening to discuss my Ernie situation. 
 When I arrived at the Doctor's office Punk did he usual thing--flirt with the receptionists, tear up some books, eat random kid's snacks, run smack into a door.

My kid is really well-behaved, any takers on babysitting?

When the doctor was finally able to see us we chatted while Punk played with that funky light that goes into woman's whoo-ha. Yeah, he was playing with that thing.

Somewhere between the "how's your summer" and "boy, does your kid have a lot of energy" Punk pooped his pants and it wasn't just the little pebble kind. No, he pooped old faithful all the way up and out his diaper.

And of course he would poop his pants on the one day where I didn't bring my diaper bag.
Luckily, the doc got called out of the room for an emergency phone call and while he was gone I frantically tried to assess the situation I had before me.

While he was out his kind nurse poked her head in to see how we were doing while I was frantically opening up every drawer in the exam room trying to find a diaper. She had sympathy on me so she helped track down a diaper and some make-shift kind of wipes so my kid wouldn't have to sit in his own filth for the next hour.

Disaster averted.

No.No.No. (kind of like. Ho.Ho.Ho., but without the joyful glee...)

As the nurse left I thought to myself, "Oh I will just change him on the exam table"...because I didn't want the doc to come back in while I elbow deep in my son's poop on the floor. 

I should have known there would be a problem because as soon as I set him on the exam table he started to squirm around and play with the paper that was covering the front of the seat. As I pushed him back he continued to squirm.

As I pulled the diaper back and began to change him he suddenly got the urge to grab the medical exam paper again. At that exact moment I saw everything happen in slow motion.

The dirty diaper went skidding out from underneath him. My hands reached out to grab it, only to grasp a large, warm, clump of crap.

As I shrieked in terror, Punk began to laugh hystarically thus wiping him crappy bum all over the exam table which was now absent of any exam paper.

As I dropped the diaper it began to slide down my body before coming to rest on the floor, crap side down.

At the moment I could hear the doctor returning so I rushed. I was like the love child of Buzz Lightyear and Lightning McQueen.

Yeah, I was that fast.

Before the doc even got the door opened I had disinfected my hands, cleaned up my kid and the exam table, wiped the poop of the floor, and myself, and managed to get rid of all incriminating evidence in a matter of seconds. 

As the doctor walked in his first was reply was, "Wow, you must know how to entertain your child because he sure sounded like he was having fun."

My reply, "Riiigggghht, you have no idea...."

And this was his face as we left the doctor's office. Complete satisfaction in a job well done.

Now excuse me while I go shower...again....

Photobucket

Nifty Chinese Boxes

posted on: Tuesday, July 19, 2011

Good morning lovelies!
Sorry for being absent the last few days. I have been super swamped with orders as of recently. At the beginning of the summer I decided that I would do two farmer's markets a week, and now it is finally starting to take it's toll.

I feel so blessed that I am busy, but it also means that I don't have a lot of free time to create new tutorials. So, I promise there will be a few new and great tutorials coming very soon!

******************

Last Friday I did a blog swap with Kim from Bugaboo, Mini, Mr. and Me.
 We decided that with each "swapped" tutorial we would come up with a "secret" ingredient that would be the main focus of our projects.
Pretty cool, huh?
Kim's  "secret ingredients" included: napkins, fabric, and/or paper.

As I began to let the creative juices flow my attention was drawn to a ream of one hundred chinese boxes that I purchased over four years ago.

They were an impulse buy. ;)

I've used a few of the boxes over the years for birthday party favors, christmas gift boxes, and as doggy bags after dinner parties.

However, I think they keep on breeding because I keep finding them stashed in closets and in dark corners around the house.

Photobucket
Now I've started to use them as gift boxes in my farmers market booth.

Photobucket
To design your own gift wrapped chinese boxes you will need:
Crinkle Shred Paper
Stamps and Ink
Chinese Boxes
tulle, fabric scraps, and ribbon
Embellishments of your choice ;)
Photobucket
I first stamped along the box using rubber stamps and my favorite ink pads.

Once the ink dried I then wrapped tulle around the boxes, attaching the tulle to sides using a glue gun.

Then I took ribbon and wrapped it over the top of the tulle.

Once the ribbon was in place I then attached fabric scraps and tickets to the box.

Finally, I wrapped bakers twine around the box to add some spunk to the gift boxes.
Photobucket
Then I placed crinkle shred paper and items from my shop inside each box!
Photobucket
Now surprise that special someone with a great gift that will hopefully last longer than Chinese takeout!

 And don't forget, later this week we will do another swap using my "secret" ingredient!

*****************************
Wanna get a double dose of me today????

 Head on over to Angie's pad at The Country Chic Cottage to learn how to make your own Limetini Ice cream!

Photobucket

Blog Swap with Kim.

posted on: Saturday, July 16, 2011

Hey Friends! Hope ya'll are enjoying this beautiful Saturday. I have a very, very special treat for ya today. Kim from Bugaboo, Mini, Mr. & Me is here, this chick has got some serious skills. Very serious.

And because we are all 'bout the serious business Miss Kim will be back next week too.

Pretty cool, huh?

Well we are going to do two blog swaps that we focus on a "secret" ingredient. buwahahaha (insert: evil laugh).

Now I will pass the torch to the one. and. only.......Kim!

****************************************************************************


Hi Spunky Junky Junkies!  I'm a huge junkie myself, and I blog over at bugaboo, mini, mr & me.  I've been a big fan of Halsey's ever since I made my first comment and discovered she was just as super nice in virtual correspondence as she is on her blog!  We've been talking about doing a swap for a while, and wanted to switch things up a little, so we decided to each pick a "Secret Crafting Ingredient" and swap not once, but TWICE!


My secret ingredient is up first.  What did I pick?  
source


Napkins!


More precisely, I chose napkins or handkerchiefs, paper or fabric.  See how much there was to play with??


I happened to have two packs of BRIGHT red and orange napkins that I got at Walmart a bajillion years ago, thinking "I could make something cool with these bright colored napkins" but then losing momentum mid-brainstorm.


I revived the napkins for this project and finally decided to make a wreath.  Here was my inspiration:
Source
Source
And after a lot of experimentation, some throwing my hands up in despair, a bit of fake cursing, and a dash of almost trashing the entire idea and throwing it all in the garbage, here is the end result of my napkin poppies:

You've gotta have:
napkins (preferably red and orange.  You know, poppy-colored)
scissors
hot glue gun
stick wreath
black beads or buttons


Now, I will start by showing you how to create the poppies.  I started by making several different shapes for the petals and gluing them together.  If you are the kind of person that likes precise measurements and so forth, you probably will not like me.  I don't measure.  But I will try to be as explanatory as possible, and really, it's pretty easy.  
We will begin with the four-petal poppy design.
Start by laying your napkin out.  For the purposes of this tutorial, anytime you see the napkin laid out like this, the corner of the napkin that becomes the middle when opened will always be at the bottom left - the folded part of the napkin along the bottom.


Cut a rounded petal-shape out of the "middle" corner of your napkin.  


I wanted to make my petals have the ridges of the poppy petals in the photos above, so I decided on an according fold.
Begin your according fold on the very side.


Then, making teeny tiny folds, go across the petal, making sure that the folds aren't straight up and down, but rather begin at the bottom of the petal and kind of fan out.  (Except at the very sides of the petal.  Those go straight up and down.)


When it's all folded up it'll look like a shriveled chili pepper.


Unfold it and use your scissors to cut along the curve at the top of the petal - just cut bits out at random intervals to make it look more natural.


When you unfold the petal, it'll look like this.

Now you have to glue it together to give it a more poppy shape.  Below is one possibility, but you could also just play with it until you get the shape you like.

Next, we'll do the three-petal poppy.  Start by laying your napkin out the same way, and then cut a shape like so:


When you unfold it, you'll get two pieces that look like this:


Fold them in half and then do the accordion fold.


When the accordion fold is finished it'll look something like this v-shape:


Unfold it and use your scissors to make the curve jaggedy and wavy again:


When unfolded, it will now look like this:


Now you need to glue it.  Here's how I did it, but again, you can experiment and glue it the way you like:


Now for the two-petal poppy.  Begin with your napkin laid out as above.  Cut two little bumps out of the side without the fold.


When opened, you get two pieces that look like this:


Fold them each in half and then accordion fold them up.


Use your scissors to make the curve all jaggedy and wavy.


And glue to make a poppy shape.  Maybe something like this:


Of course, you can make single petals as well to create a whole flower or add to the pieces you've already made.  Just cut out an oval shape, fold in an accordion fold, make the curved edge wavy, and separate all the pieces.


Then you can combine your petal shapes in different ways.  For instance, you can put a single petal with a double and a four-petal.

And it will look a little like this:


Now, you've got your stick wreath.  (In actuality, you can use any wreath form you want, but I liked the stick wreath because it went with the "natural" element).


And one at a time, glue your poppies to the wreath.


You can bunch them as close as you want or spread them out a bit.  Mine aren't bunched too tightly, but they are positioned so you can't see a ton of the sticks in the front.


Just keep going.  


And when I was done with the red ones, I positioned some orange ones here and there for a pop of color.


Take your black beads.  Mine were from this old bracelet I never wear.  I just cut it apart.


And each individual poppy gets at least one black bead,


but the bigger poppies get more.


The black beads are pretty essential to making the wreath look like it's made of paper flowers and not just crumpled up tissues.


See?


And there you have it!  It's finished!  Hang and impress your neighbors.

Just want to thank Halsey for swapping with me and thank you all for reading along!  Stay tuned next week for what I made with Halsey's secret ingredient!  Oh, and don't forget to come say hi!


Spunky Junky All rights reserved © Blog Milk Powered by Blogger