Just so you know...

posted on: Wednesday, November 30, 2011

I've been overwhelmed.

It's nothing that can't be cured by a little bit of ice cream and some Grey's Anatomy though.

We've been making a lot of big changes around here--some for the better, some I'm still not quite sure about.
While I feel that I am pretty easy going when it comes to change; it's the decision-making process that often leaves me dazed and confused.

I am one of those people that will buy four bags of chips when I am at the grocery store because I can't decide on just one flavor--the same may be true for ice cream, shoes, and chocolate...

;)

I also must confess. One of the hardest choices has been blogging.

As you may have noticed my posts have been more limited and less creative-like in the past few months.

....................

Last summer Hunk started a new job--which we are so thrilled about.

He is now a CFO at a small hospital--I call him a big deal, he rolls his eyes and scoffs.

While we love the experience he is gaining and the opportunities that await us in the future, the difficulty that has arisen from this new position is that he must travel two hours a day for work and he often has to stay and work late many nights.

This has meant that I have had to step up--in my role as a parent, as a homemaker, as a wife, as a task-manager...

While I use to spend a large majority of my time making projects, sewing, blogging and decorating; now, I need to play the role of a parent to an overly sugar crazed two-year-old, while also attending to the daily needs of the house.

This means I am often the one taking vehicles to get the oil changed, making sure tires get rotated, running errands for Hunk because he is never home in time, and making sure that everything is completely done so that when John walks in the door we can have a few quality hours minutes together.

I'm not sad or annoyed about how our life has changed, it's just meant that for the time being I have needed to prioritize, and sadly, blogging has been one thing that has suffered because of the change.

Let me emphasize...this post is not a gentle way of saying I'm stopping. Heck no, I've worked way too hard to let this baby go.

What I am saying is that there may be some changes (if you haven't already noticed).

It will mean less giveaways and more day-to-day life posts.

Seriously, I could write three novels on living with Brecken.

So you may see a lot of his face, a lot more of my face (not behind the camera), and a lot more about the fun and new changes that are happening in our life.

(I REALLY want to talk about them now....but I must resist).


So, hold on and stay with us as we still try to transition to this new schedule and lifestyle.

Because WE LOVES YOU BIG TIME!

Giveaway

posted on: Tuesday, November 29, 2011

After this year's Black Friday and Cyber Monday, Tuesday should be declared a national holiday to recuperate--
running through aisles,
standing in line for hours to get into a store,
scanning ads,
beating an old lady to the last flip waffle maker,
standing in the checkout line for 55 minutes
waiting patiently until midnight to get the best gift online,
having the computer crash at the moment of purchase--it really tires a person out.

I couldn't handle the pressure this year, you really have to mentally prepare for it, so I stayed home and slept in.

But for all of you that did brave the crowds, lines, and fanatics--I "high-five" you from afar.

I also have an exciting giveaway for ya.


Today, I am over at Southern Lovely giving away a ring from the mocha collection and a pair of mum earrings.

No lines, no fighting, no computers crashing--just leave a comment or two over at Southern Lovely and you have a chance to be the winner!

Pretty sweet deal, huh?
Photobucket

Winner! Winner!

posted on: Monday, November 28, 2011

We have a winner of the Shabby Apple Bow Skirt Giveaway!

Congrats #15 The Arave Family!

Send me an email within the next 48 hours!

Also, don't forget that you have until midnight tonight to save 30% on your ENTIRE order in the Spunky Junky Etsy Shop!

Hope you are having a great evening!

Photobucket

Thanksgiving

posted on: Saturday, November 26, 2011

Would that be my son eating of his cousin's Thanksgiving plate?! For shame, Brecken, for shame!!!

Thanksgiving was chill this year. Not necessarily in the "cold" way, because it was abnormally warm. This year, the Punk and I slept in, woke up and made a huge breakfast--for ourselves. Then we spent the morning lounging in bed watching Robots.

When I lost interest in Robin Williams voice for the millionth time I escaped to the kitchen where I made pies, while listening to Christmas music.

It was nice and quiet.

Hunk was hunting, the laundry had been finished a day early, and Punk entertained himself  all morning, so I say--score one for this lady!

Later the cousins came over and we went to the park where they soon engaged in a vicious game of snowball fighting--I stayed out of their way. Our snowballs are more like ice balls.

********************

Dinner was amazing. Seriously--turkey, potatoes, green bean casserole, and stuffing have never tasted so freaking good.

My sister-in-law made a white chocolate cheesecake that put my pies to shame. It may have been the best thing ever.

**************

We were smart and decided to not brave the stores at 10 or 12. Good way to ruin the Thanksgiving spirit by pushing people aside to get to the doll that pees and wiggles on it's own, right?

I did kind of miss the crazy people though. Do I need to explain? No, you all know what I'm talking about....

Shopping at 9 in the morning just wasn't the same as shopping at 3 with the fanatics, it may be more enjoyable than airport people watching. Yes, I am one of those people.

How was your Thanksgiving? Did you brave the stores and see the crazies? Please say yes, I need to live vicariously through someone....

Somewhat Simple Boutique and a BIG Discount

posted on: Friday, November 25, 2011

Good Morning Friends! Have you recovered from your turkey overload yet?

What time did you leave the house to enter the world of money saving crazed fanatics? I usually am one of those people, but sadly, I'm still in bed rigt now.

Blasphemy, right?

I'll be leaving my house out shortly and I just wanted to stop by and tell you about an awesome event that is going on this weekend.

Steph at Somewhat Simple is hosting her ever famous Somewhat Simple Holiday Boutique, this event highlights lots of amazing shops with awesome discounts that can be used from now until Cyber Monday.

The best part?

I am offering my biggest discount ever!

Right now you can save 30% off your entire purchase in my etsy shop!

Just use code: SIMPLECHRISTMAS11

And don't forget to check out her website for more amazing deals!

Enjoy and Happy Shopping!

Photobucket

Thankful.

posted on: Thursday, November 24, 2011

If only everyday was specifically dedicated to being thankful for the blessings in our lives.

Could you imagine what the world would be like?

Today I thankful for so many things:

Friends.

Family.

Home.

Health.

Motherhood.

Financial stability.

The gospel.

Laughter.

Love.

Hunk and Punk.

To name a few....

I wish you all a safe and Happy Thanksgiving.

Enjoy the best parade of the year and make sure to gourge your face out on some turkey my friends! 


Photobucket

Somethin' for the Boys

posted on: Monday, November 21, 2011


There is now something for the boys in my etsy shop.

Adjustable bow ties.

Enjoy!
Photobucket

Chocolate Pudding Pie


When I was 21 I cooked my first full-blown Thanksgiving dinner. all. by. myself.

I've never had a fear of cooking, it has always been relatively easy-follow the directions, measure the ingredients correctly, and cook at the proper temperature.

Cooking is easy. Baking, no so much.

Even when I follow the directions step-by-step I still manage to ruin cupcakes from the box and Tollhouse chocolate chip cookies from the sleeve.

So even though I managed to cook an entire Thanksgiving dinner by myself, for the sake of all of those eating my food I steered away from making a pumpkin and apple pie.

But every Thanksgiving dinner has to have pie, right?

So over the next few days I will be showcasing my favorite no-bake pie recipes.

Chocolate Pudding Pie


1-5 oz. package chocolate pudding
2 cups cold milk
1-large graham cracker crust
1-8 oz tub of whipped topping
1/4 cup Wilton's melting chocolates

Mix cold milk and pudding.

Once whipped, mix half the tub of whipped topping into the pudding/milk mixture.

Pour filling into graham cracker crust.

Top with remaining whipped topping.

Melt chocolates in microwave. Poor melted chocolates onto the backside of a cookie sheet, allow chocolates to harden.

Once the chocolate has hardened use a metal spatula to scrape the chocolate off the cookie sheet.

The chocolate with begin to "curl."

Once you have a handful of curled chocolates place them on top of the pie.

Freeze for 5-6 hours. Allow to unthaw for 15 minutes.

Serve and enjoy!

Sorry I don't have my own picture....I always make my pies the morning of Thanksgiving and I thought you would want the recipes before the big day--pictures of my lovelies will follow after the event.
Photobucket

Give Thanks!

posted on: Saturday, November 19, 2011


Today is the big day.

The biggest football game in the State of Montana is about to happen for the 111th time and our house will be bustling with excitement soon!

 I am grateful today for a two-year-old who has given me a legitimate excuse not to be tailgating in this sub-zero weather.

And because I am so grateful for all of you, for two days only I am offering 20% off your entire order in my shop!

Just use promocode:
GIVETHANKS20

Have a happy and safe weekend!

Photobucket

DIY Tissue paper ornaments

posted on: Friday, November 18, 2011

My plan was to showcase a few of my new Christmas ideas today, but (and that is a BIG but (hahaha)) that didn't happen.

Have you ever had an idea for a fabulous project, one that seemed so perfect in your mind, but as you were starting and even close to finishing, it became more of a disaster.

Yes?

Well that was my project--I need to do some revamping and I hopefully will have it up this weekend.

Here is a final tutorial that I did last year that for a Handmade Christmas Ornament Party

And don't forget to link up your favorite Christmas posts today!

**************************************************************
 I get totally psyched for Black Friday and I have this weird obsession with clearance racks.

I get giddy over making things for little to no cost and I just love finding things that are so cheap that I feel as though I am ripping off the store.

Photobucket 

These ornaments totally fall under the cheap, easy, and "oh so pretty" categories!
Photobucket

For this project you will want:
*Styrofoam balls
*ribbon
*tissue paper (cut into 1 1/2 inch strips)
*embellishments
*glue gun


Photobucket
 I used a pen to poke a hole through the stryrofoam ball for the ribbon.

Photobucket
I then used the pen to push the ribbon through the hole. NOTE: Make sure to glue the ribbon to the underside of the ball.

Photobucket
While the glue dried I started to make the tissue paper rosettes.I took one of the strips of tissue paper and crumpled the end.

Photobucket
Then I began to twist the tissue paper around the crumpled center. Every so often I made sure to put a dab of hot glue on the rosette so it did not fall a part. As I wound the tissue paper around I would switch between twisting inward and twisting outward. It helped give a different kind of effect to the rosettes.

Photobucket
Here is what the rosette looked like when I finished.

Photobucket
For a small ball I made twelve rosettes--you may use more or less depending on how big or small you make YOURS ;)

Photobucket
I then took the dried rosettes and started to glue them to the ball. NOTE: You will want to start at the top and work your way down.

Photobucket
There were gaps in between some of the rosettes so I took scraps of the tissue paper and stuffed them in the open areas.

Photobucket
Cool. Huh?

BUT WAIT...I am not going to sell you a Sham-WOW!!! Jokes.

I love shiny things...yes, I am a typical girl. So I decided to spice up my ornaments!

Photobucket
I used a variety of embellishments, any type will work: buttons, brads, pearls, faux gems.

Photobucket

Finished product:
Tissue paper: FREE
Styrofoam balls: S1.00
embellisments: FREE


Walnut Wreath

posted on: Thursday, November 17, 2011

Howdy Ho, Friends!

Are you getting excited for the weekend yet?

I know it's not Friday, but around here everyone is getting ready for the football game of the year. We love football--especially Cat/Griz.

Go Cats!

So while I am preparing the food and festive activities for this weekend I thought I would share another one of my simple, but fun Christmas tutorials.

*******************************

I did it. I jumped on the bandwagon. I mean, really, who wouldn't? I have seen them all. Lima bean wreaths, hazel nut wreaths, candy wreaths, feather wreaths, cupcake wreaths--wreaths, wreaths, wreaths.


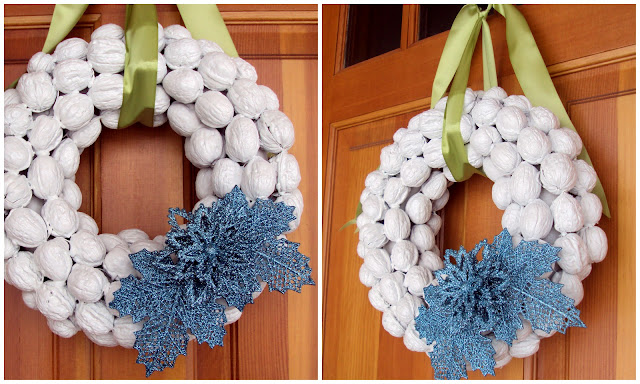
So I did it, I gave in and made a walnut wreath.

 The supplies are simple. However, finding walnuts proved to be a more difficult venture. I am sure you will have better luck finding them then I did. I finally found some at Wally World...go figure ;)


 So I bought four bags of the JUMBO walnuts. I am not a walnut expert but they are big guys! I ended up using every single one; so if you use a ten inch wreath form then you may want four bags as well.


 I started off by gluing the walnuts to the wreath. I made sure to also glue the walnuts to each other for added support.


Fairly simple, right?

When I finished my wreath weighed the size of a small large country.


I knew I wanted to coordinate my wreath to match my Christmas colors so I gave it a coat of Kilz Primer as well as a nice cover of Krylon white spray paint

 the spray paint obsession continues.....


 While the wreath dried I sorted through some fan-tabulous ornaments that I picked up at Wal-Mart. I decided to use these ornaments to embellish the wreath.

The best part about these little guys is that they were only a dollar a piece.


Sparkly, cute, and cheap, what could be better?


 I then took my nifty glue glue and stuck the ornaments to the wreath, added a coordinated ribbon and hung the sucker on our front door!


Voila!

Update: Because this wreath is so heavy make sure that the ribbon is very secure. I had a near scare last year. Now, that it has a better ribbon it has hung on a peg in my basement all year without falling.

FYI.... don't forget to enter this week's lovely giveaway from Shabby Apple!
Photobucket

Spunky Junky All rights reserved © Blog Milk Powered by Blogger